QUICHE WITH SALSA

Quiche  (use individual sized Quiche cups)

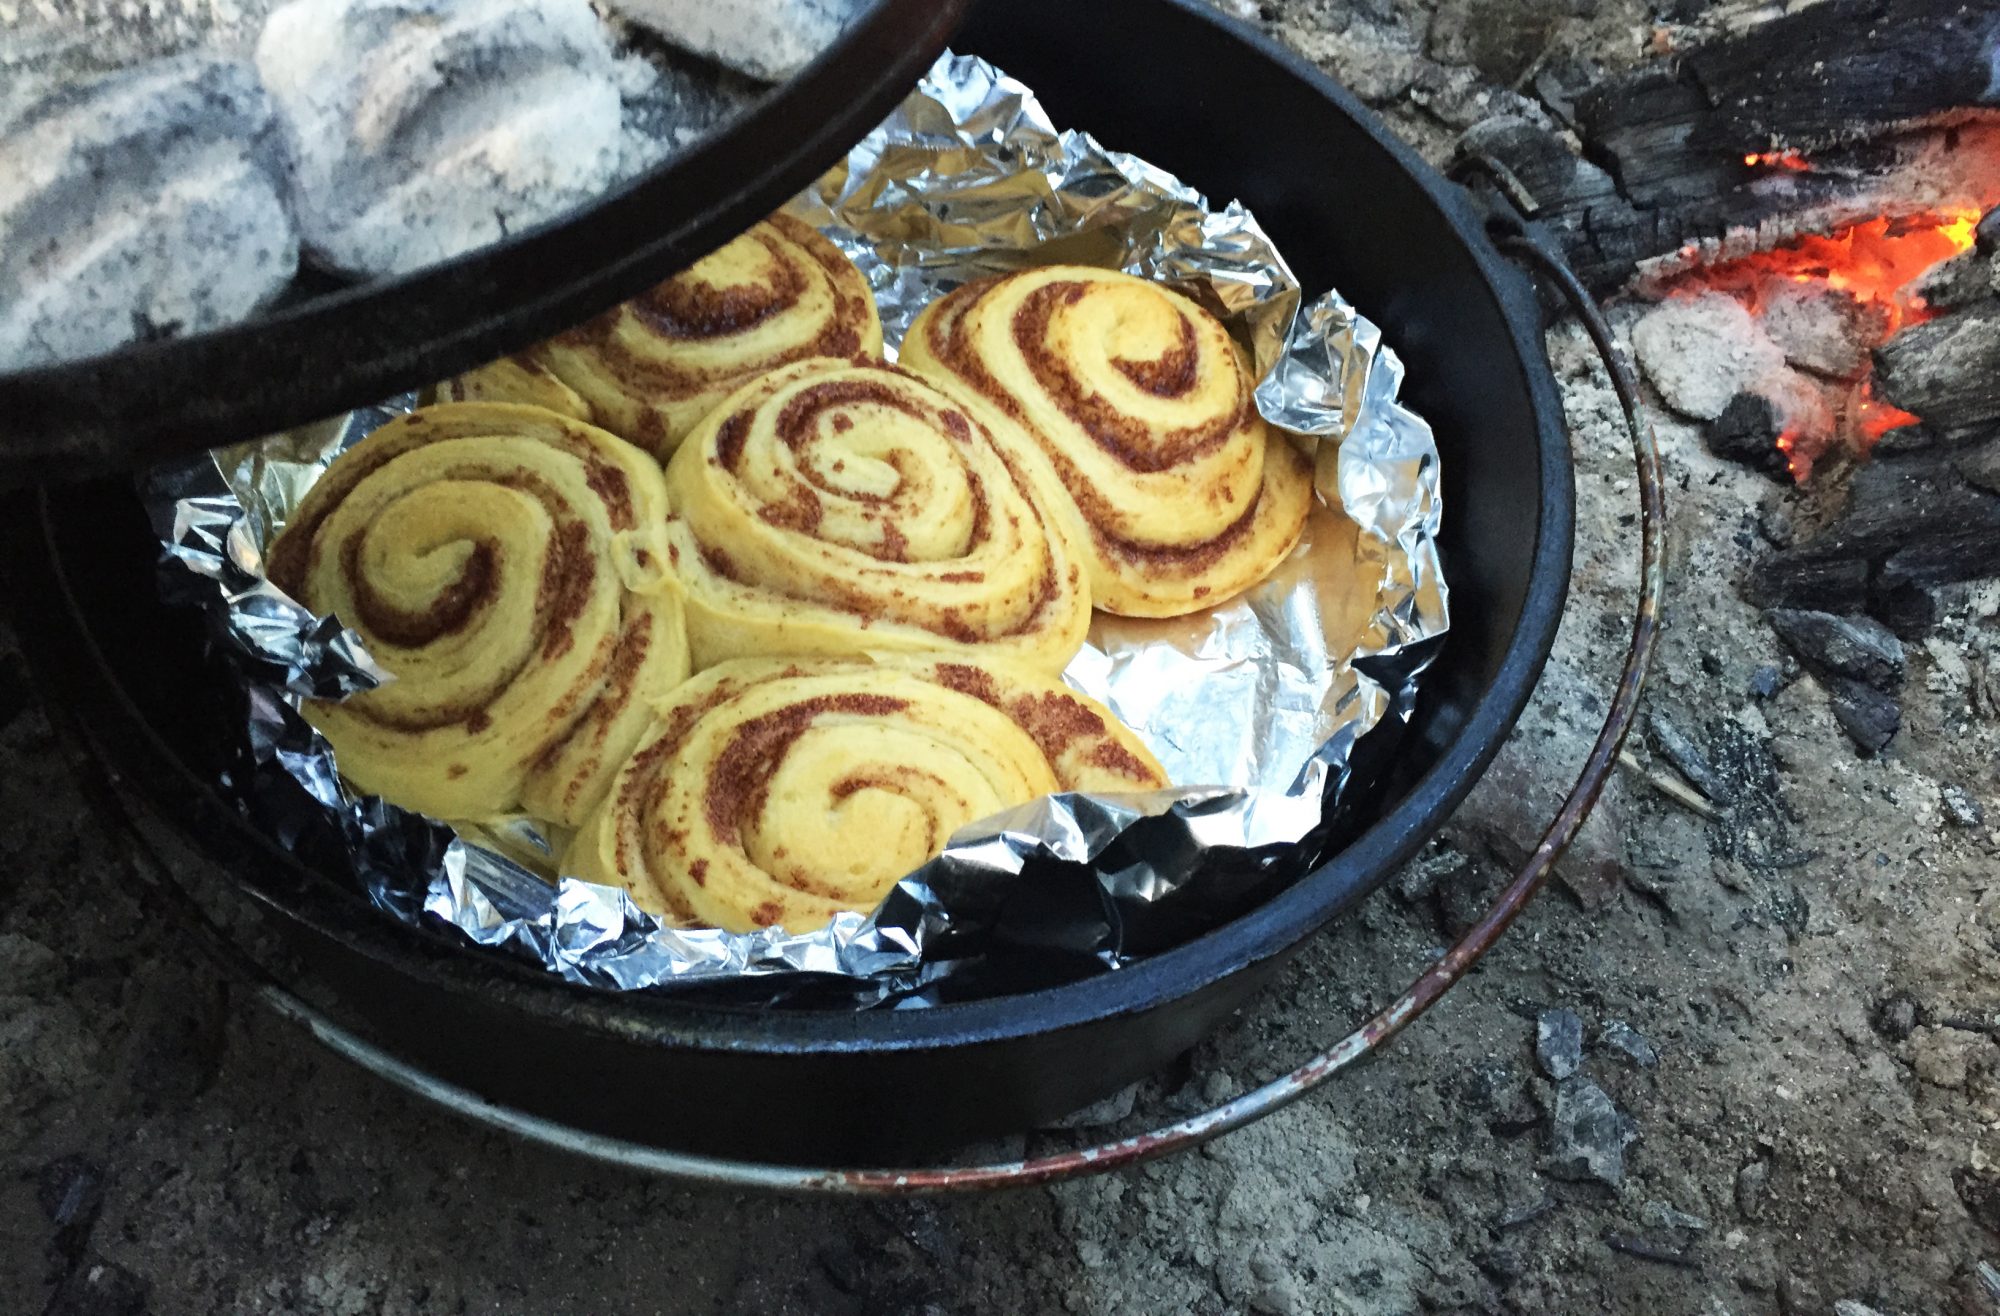
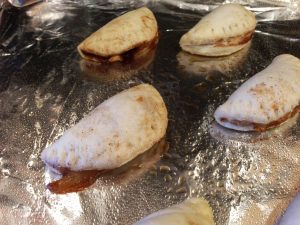
These can be baked in your kitchen oven or
in a covered Dutch Oven with coals for 350°F

Uncooked Egg Whites scrambled with a fork (Or all white Egg Beater type)
Fresh Spinach Leaves/Heated wilted
Fresh Cilantro Leaves/Heated wilted
Sweet Onion sliced thin and slightly sauteed
Garlic Minced
Cooked Turkey or Deli Sliced/Cut in small cubes
Feta Cheese
Parmesan Cheese Fresh Grated (used as a topper only)
Salt & Pepper

Spray oil the quiche cups

Start by adding about a 1/4 inch of raw egg whites
Layer in a little of all ingredients except the Parmesan Cheese
Add a second layer of egg whites
Add another layer of all ingredients except the Parmesan Cheese
Continue until the quiche cup is full with about a 1/4 inch to spare
Sprinkle the top with Parmesan Cheese
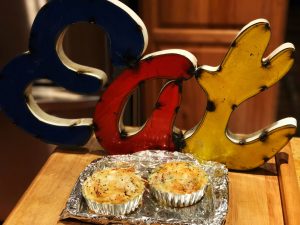
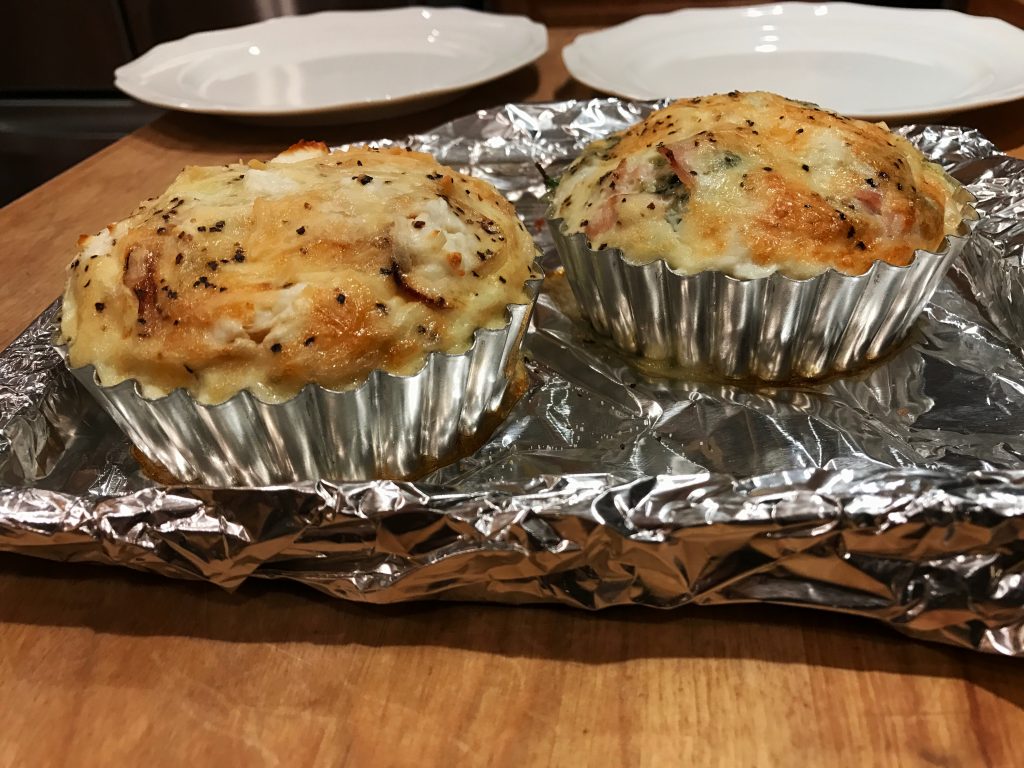
Bake at 350°F for about 20 minutes or until golden brown on top.
They should look rather puffed up like a cup cake when first off the heat
As they cool they will deflate and be about even with the top of the quiche cup
Serve with fresh salsa

Fresh Salsa (For 2)

1    Roma Tomato (Very Ripe)/Diced
1/4 Cup   Sweet Onion/Chopped
2 Tbsp.   Fresh Cilantro Leaves/Chopped
1 tsp.    Fresh Garlic/Minced
1 Tbsp.  Ketchup
1/2 tsp.  Sriracha Sauce
Salt & Pepper

Mix all ingredients together and serve

QUICHE WITH SALSA

Loading

FINDING WILD CAST IRON

I refer to “Finding Wild Cast Iron” as something the is not store bought.   At least not bought in a store by me.  Those precious finds at a Garage Sale, Estate Sale, Flea Market, etc.  Just like stumbling into wild succulent mushrooms while out hiking in the woods.

People that are new to using cast iron often ask “Where do I buy”, and What should I buy?  That is a difficult question to answer with no other input provided.

I collect cast iron and have way too many stacked away here and there.  But I really enjoy vintage cookware.   Much of the vintage pieces are far superior to modern day cast iron.  Modern day foundries tend to produce “rougher” finishes.  I assume it is to reduce production costs to remain competitive?  Lodge is one of the leaders of USA made, and currently a cookware producing modern day foundry.

If you are patient and look in the right places you can save lots of money.  If you are new to cooking with cast iron you may find the “In the Wild” option a better way to go in case you decide using cast iron is not for you.   Someone will always buy a used piece for what you paid for it…..if you find the bargains out there.

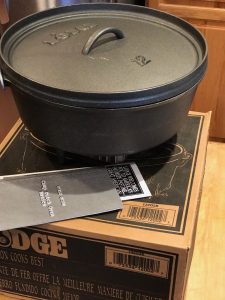
Today’s image in this article, is a garage sale find this morning.  I paid $15.  This is a Lodge 12 inch “Camp” or “Outdoor” Style Dutch Oven.  I say “Outdoor” because it has feet and the raised ridge lid for containing coals.   On the low cost end this would retail around $60 when new.  This Dutch Oven came in the original box, never used, never seasoned, even had the original paperwork.  It looks brand new.

Dutch Ovens made for use in your regular kitchen oven normally have no legs,  just a smooth bottom.  The kitchen version lid is more domed shaped with no raise ridge since retaining coals is not a requirement.

While you may not find “wild cast iron” with the original box, and in this condition, finding some of the older vintage cookware is an even more gratifying score.  Cast Iron Fever (Collecting) can develop into something hard to control.

For someone starting out I generally first recommend starting with a 10 inch “camp” style Dutch Oven.  My second recommendation would be for the same in the 12 inch size.  Most recipes work equally well in either of these two without adjustments to ingredients or temperature.  They are both great for Casseroles,  Meats, Chili, Cakes, Cobblers, Mountain Man Breakfasts, and so much more.


Loading

BISCUITS – OLD FASHION BUTTERMILK RECIPE


BISCUITS - OLD FASHION BUTTERMILK RECIPE

Prep Time 15 minutes
Cook Time 14 minutes
Total Time 29 minutes
Servings 12 Biscuits

Ingredients
  

  • 3 Cups Flour
  • 3 tsp Baking Powder
  • 1 tsp Salt
  • 3/4 tsp Baking Soda
  • 1/2 Cup Butter Shaved Frozen or real cold
  • 1 3/4 to 2 1/2 Cups Buttermilk Real cold (start with 1 3/4 Cups)

Instructions
 

  • We recommend not substituting the real Buttermilk with an alternative.
    Not even powered Buttermilk.
    Do not make with regular milk, adding lemon juice or vinegar to regular milk, etc., While that is an acceptable alternative in recipes with sugar or sweet. It is not recommended for biscuits.
    If your baked biscuits seem dry or clunky increase the Buttermilk slightly until you know the perfect mix for your area and oven.
  • There is a definite knack to baking light and fluffy biscuits. A couple of secrets to good biscuits is very cold Butter and Buttermilk, not mixing the dough much, and folding and patting the dough several times. Probably a wetter mix than you would imagine if your biscuits don't come out right.
  • Properly mixed biscuit dough almost looks like it hasn’t been mixed all the way. The other secret is a very moist mix. Sticky, requiring a floured board and floured hands to handle.
  • Never use an electric mixer or dough machine when mixing up biscuits. Use a fork, and use it as little as possible.
  • Also old stale Baking Powder (opened and on the shelf for awhile) looses its ability to create the bubbles required to raise good light biscuits. Pitch the old stuff and use fresh.
  • Mix your dry ingredients together with a wire whisk.
  • Shave cold butter with a potato peeler or other type of cutter. Or chop frozen. Keep butter very cold until ready to mix in.
  • Then stir in the cold shaved butter into the mixed dry ingredients. Alternatively if your chunks are big you can “cut it in" into the dry ingredients using a shortening cutting tool, made for that, or two knives. All pieces should be pea size or less. Mix in the first 1 3/4 cup of Buttermilk gently (Do not over mix) using a fork. If dry add more in small amounts until dough is almost too sticky to handle (flour your hands)
  • The buttermilk in this recipe is part of the leavening (makes the bubbles) The acidity of the Buttermilk reacts with the Baking Powder & Soda. Don’t substitute the buttermilk with something else for this ingredient if you are new to making biscuits.
  • The dough should be sticky. Probably more sticky than you think. Mixing the ingredients too much, or too dry is the killer of soft and fluffy biscuits. Plop the sticky dough out on an extremely well floured bread board.
  • Flour your hands. Don’t roll dough out, but pat or gently flatten with your well floured hands (about 1 1/2 inch thick. Fold the dough in half over on itself and gently pat the dough to 1 1/2 inch thick. Repeat the fold and pat two more times.
  • Preheat a regular oven to 400 degrees. (Dutch Oven Coals for 400°F-Don’t pre-heat the Dutch Oven)
  • Cut rounds with biscuit cutter or top of a small drinking glass, can, etc.
  • Place biscuit rounds on a cookie sheet or into the bottom of the Dutch Oven up against one another. Closely placed biscuits will also be much more moist when done. Biscuits placed next to each other will rise much higher than those placed with gaps between them. Cover with a towel and let the biscuits rest for 10 to 15 minutes before putting them in the oven, or putting the heat to the Dutch Oven.
  • In a regular kitchen oven Bake 14 to 18 minutes or until golden brown on top. If Baking using charcoal in a covered Dutch Oven, it is also 14-18 minutes or until tops are golden brown.
  • It is assumed you know proper coal/heat techniques for Dutch Oven baking
  • Click this link below in Recipe Notes if you need help with Dutch Oven Coal counting? We prefer the 3 uppy-down rule!
  • Serve hot with butter, jam, gravy, etc.

Notes

Additional Dutch Oven Baking Tips & Techniques   COAL COUNTING & HEAT MANAGEMENT
Make your own "Probiotic" rich BUTTERMILK

Loading

BBQ PULLED PORK RECIPE

BBQ PULLED PORK RECIPE

Award winning recipe by Rick Beach. Took First Place "Main Dish" in the "Old Mormon Fort Dutch Oven Cook-off Competition", held in Las Vegas, Nevada (March 2017). If you have the means to smoke this. I often prepare and cook it as shown. Then using a smoker on about 250°F. Smoke the Meat mixture uncovered. I lay on smoke for an additional 2 hours. Stir once about mid way. Watch your moisture content so you don't dry it out. The taste will be incredible.
Servings 24 Sandwiches

Ingredients
  

  • 3 1/2 lbs Pork Loin Cubed in 2 inch chunks
  • 6 Leaves Whole Bay Leaves
  • To Taste Salt & Pepper
  • 1 Medium Sweet Onion Diced
  • 3/4 Bunch Celery Chopped
  • 4 Cloves garlic Minced
  • 2 Cans 10oz Size Condensed Tomato Soup
  • 1/2 Can Water
  • 1/3 Cup Worcestershire Sauce
  • 2 Tbsp Liquid Smoke Hickory Flavor
  • 1/2 Cup Wine Vinegar or Cider Vinegar
  • 1/4 Cup Brown Sugar
  • 3 Tbls Mutard Regular Yellow (French's)
  • 1 cup Ketchup
  • 1 tsp Sriracha Sauce

Instructions
 

  • Optional ingredients such as additional Sriracha Sauce, or various peppers, could be added to the basic sauce to spice this up. Add in very small amounts and cook at least 30 minutes then taste test before adding more. Hot spices tend to intensify as cooked. It is easy to overdo hot spices and ruin a batch for the majority of your guests. A double batch (about 7 lbs of meat can be done in a 14 inch Dutch Oven.
  • The basic sauce has always been the most popular in large groups. Spicy is not. You can multiply this recipe based on the group you are serving. The BBQ can be made ahead and put in the freezer for later use. This is served on hamburger buns. A stack of coleslaw on the BBQ before adding the top bun makes for a killer BBQ sandwich. This recipe makes approximately 24 standard hamburger sized bun servings.
  • Place the chunked up Meat, Bay Leaves, Onion, Celery, and Garlic, in a greased heavy pot with lid for baking. Preferably a Cast Iron Dutch oven is used. Meat is slow cooked with lid on. If using a Dutch Oven, and coals, use coals for 325°F heat. If using your kitchen oven use 325°F also. Use a pot sized to be at least half filled to avoid burning.
  • Bake for 2 hours then stir the meat chunks to rotate the bottom pieces to avoid burning. There should be plenty of liquid remaining at this point and the meat just starting to shred apart. If liquid is completely gone add 1 cup of very hot water, cover, and bake for 1 more hour. Stir again and check for liquid. If the meat is falling apart it should be ready to shred. If not, bake an additional hour but make sure there is some liquid. I have never had to go more than 4 hours baking. Remove lid and keep on heat or in kitchen oven just until all liquid is absorbed or evaporated. Check and stir often during this process…don’t burn it.
  • Once the meat is falling apart easily, remove the bay leaves and discard the leaves. Use 2 forks to shred the meat. I like to use a potato masher to speed up the shredding. Break apart the meat until it is all completely shredded.
  • In a large mixing bowl place the remaining ingredients. Add the Soup, Water, Worcestershire Sauce, Liquid Smoke, Vinegar, Brown Sugar, Mustard, and Ketchup. Whisk until combined. Then pour liquid mixture into the baked & shredded meat mixture. Then stir and fold to combine.
  • Cover and bake for 1 more hour. Ideally the finished mixture is a Sloppy Joe consistency that doesn’t run. If you’re finished BBQ is too thin/watery, cook/bake with lid off, stirring occasionally to avoid burning. Cook/Bake uncovered until it reaches your desired consistency.
  • Optional: Additional smoking process. Leave the mixture slightly wet. Using a Smoker set on 250°F lay on smoke for an additional 2 hours with the meat mixture uncovered. Stirring once about mid way through the smoking process. Watch that the mixture does not dry out. The smoke enhanced flavoring is incredible.

Loading

APPLE TURNOVERS MINI RECIPE

APPLE TURNOVERS MINI RECIPE

Prep Time 30 minutes
Cook Time 12 minutes
Total Time 42 minutes
Servings 36 Mini Turnovers

Ingredients
  

  • 4 (9 inch) pie crust dough sheets uncooked
  • 1 Can 21 oz apple pie filling
  • 1 tsp cinnamon
  • 1/8 tsp Salt
  • 4 Tbsp Butter

Instructions
 

  • In a bowl first slice up the apples into small bits about 1/4 inch. Next mix in the Cinnamon, and salt. Set this apple filling mixture aside.
  • Roll Pie Crust dough to pie crust thickness on a piece of plastic wrap laid out on your counter. Cut circles of dough (about 3 inch diameter) with a biscuit cutter or the top of a drinking glass or opened can. Pull up all the trimmed dough pieces. Ball up the trimmings and roll that out and cut more circles. Repeat until you have made use of all the dough.
  • Take a small piece of butter, about the size of half a pea. Put a small piece of butter into the center of each dough circle. Next spoon about a 1/2 teaspoon of your pie filling mixture on to the center of each dough circle. Fold the dough to make a half circle with a pocket of the filling inside. Seal the edge using fork to press them together.
    Take a small piece of butter, about the size of half a pea. Put a small piece of butter into the center of each dough circle. Next spoon about a 1/2 teaspoon of your pie filling mixture on to the center of each dough circle. Fold the dough to make a half circle with a pocket of the filling inside. Seal the edge using fork to press them together.

Optional

  • Bake in a preheated 350° oven, on a grease cookie sheet, 8 to 12 minutes . Or until just starting to brown.
  • Or instead of baking you can deep fry. Deep Fry at 375° until golden brown. It won’t take but a minute or two. Watch them closely.
  • They can be glazed with cream cheese icing, brushed with a powdered sugar type glaze, or sprinkled with powdered sugar.

Loading

BACON BOMB RECIPE

BACON BOMB RECIPE

Recipe and Photos submitted by Bruce Tracy. This Dish looks difficult to do but it is very easy. Get all ingredients on the counter before you start. Then all you have to do is reach and add. Many versions of this recipe use seasoned sausage. I don't think that is necessary.
Prep Time 30 minutes
Cook Time 1 hour 30 minutes
Total Time 2 hours 20 minutes
Servings 8 servings

Ingredients
  

  • 1 lb bacon Thick Cut
  • 2 lbs Ground Pork
  • 8 oz cream cheese room temperature
  • 1 medium onion sliced thin
  • 1 Sweet Green Pepper diced
  • 1 bottle BBQ Sauce

Instructions
 

  • You will need a Dutch Oven, a Trivet, Foil or Parchment paper, and a cooling rack.
  • Cut four pieces of bacon into 1/2 inch pieces and fry to your preference. Set aside to drain. Lay a sheet of parchment paper on your counter and place the ground pork in the middle. Spread with your hands until you have about a 10 by 10 inch square about 1/2 inch thick.
  • Spread the cream cheese over half of the pork and add the bacon bits, onions and bell peppers. Gently roll it up from the cream cheese side. Set aside.
  • Make a 5 by 5 lattice with 10 pieces bacon. Googling bacon lattice will give you several “you tube” videos, it’s way easier than you might think. Place the pork roll with the seam toward you on the edge of the lattice closest to you. Roll it on the bacon, picking up the lattice as you go. Remember where the seam ends up.
  • Place cooling rack on a cookie sheet or inside a Dutch Oven. Place a piece of parchment paper on it. Place the bacon encased pork roll on the paper, seam side down. Brush liberally with BBQ sauce.
  • Roast for about 75-90 minutes at 425 degrees. Check with a meat thermometer at 75 minutes.
  • When it reaches 155 brush one more time with bbq sauce and continue cooking for 10 more minutes.
  • When it’s done let it sit for 15-20 minutes so it can set up.

Notes

Follow Bruce on Facebook at https://www.facebook.com/bruce.tracy.5
Interested in Bruce's hardcover Dutch Oven Cookbook?
One of many sources to purchase "Dutch Oven Baking" by Bruce Tracy

Loading

BAKED BEANS (CATERING SIZE) RECIPE

BAKED BEANS (CATERING SIZE) RECIPE

[Original Recipe by: Rick Beach] Serves 20-30 depending on how many side dishes are available. This is a great recipe for catering, receptions, parties, and large groups. It half fills a 1/2 size steamer tray. A stainless steel tray 12x10x4 inch size. A double batch with fill a 1/2 sized steamer tray. A stainless steel tray 12x10x4 inch size.
Prep Time 15 minutes
Cook Time 1 hour
Total Time 1 hour 15 minutes
Servings 20

Ingredients
  

  • 1 Can 117 oz Baked Beans Drained
  • 1 Cup Ketchup
  • 1 Cup Brown Sugar Packed
  • 1 Cup Sweet Onion Chopped & Sauteed
  • 1 Cup Sweet Green Pepper Chopped & Sauteed
  • 2 Tbsp Garlic Powder
  • 1/8 Cup Mustard Prepared French's Regular type
  • 1 Tbsp Worcestershire Sauce
  • 1 Tbsp Liquid Smoke
  • 1/2 Lb bacon Small pieces browned
  • 1/2 tsp Salt
  • 1/2 tsp Black Pepper
  • 1 Pinch Cayenne Pepper [this is optional - omit this the first time]

Instructions
 

  • Preheat oven to 350°F Grease foil pan 10X14X3 or similar stainless steamer tray Mix all ingredients and dump into greased pan. Place on cookie sheet for support Bake for 1 hour uncovered or until liquid is nearly gone Chill and serve cold (Can also be served warm)

Loading