Are you looking for a method to estimate the amount of hot coals when Dutch Oven Cooking?
Here are some things to know and a couple common methods. Someone told me not too long ago they had an app on their phone with a charcoal calculator.
Since we are cooking the old fashion way, lets use our old fashion brain to remember how to get our heat right.
I personally use the 3 Uppy-down rule. Easily to remember and nothing to carry. The same rule adapts to all diameters of Dutch Ovens. It applies to all types of recipes too.
If you can successfully bake a recipe in your kitchen oven, there is no reason you cannot produce similar results using a Dutch Oven, and hot coals.
There is some science to using coals. You have to be aware of some of the issues to get consistent heat.
Consistent heat can be generated from modern Charcoal. Whether you cook in competition (which I and many friends do), or just want to master your skills preparing family meals.
Be aware temperatures and cooking time can even vary between charcoal brands. My “go to” preferred brand is Kingsford.
Campfire coals are a different animal. I am not discussing them in this article. Other than to mention they are another option. They are a usable source of heat if you care to master another technique.
My suggestion for new Cast Iron Cooks, is to select your choice/brand of charcoal briquettes. Then stick with your selection until you are cooking with consistent results similar to what you obtain using your kitchen gas or electric oven. Once you get the hang of it, start experimenting with other brands, or campfire coals, and various species of wood.
There are other methods and techniques not covered in this article. Many cooks have their own special way of getting the heat right. There are many seasoned cooks out there cooking over fire….and just as many methods of doing that as well. So we will list a couple methods for charcoal, to get you started in this great past time of Dutch Oven cooking. Search for more, or join a cooking group to see how its done…then use your favorite method.
As we mentioned, we have had the best results with Kingsford brand charcoal. It normally is ready to go 15 minutes after starting, and generally gives you about 45-60 minutes worth of cook time. A great choice to start with before you venture on to other experimentation.
I personally use Kingsford brand at home, and during competition cook-offs. Plus it is often the provided brand at cook-offs where charcoal is supplied. This is not a paid endorsement, but a personal preference and recommendation.
Other factors such as wind, altitude, and surrounding air temperature, affect your cooking heat and cook time. In this article we are only going to provide a couple general “rule of thumb” methods to obtain your heat. This is under no wind (or using a wind screen to block the wind), and during comfortable air temperature such as spring, summer, and fall. Also at normal altitude.
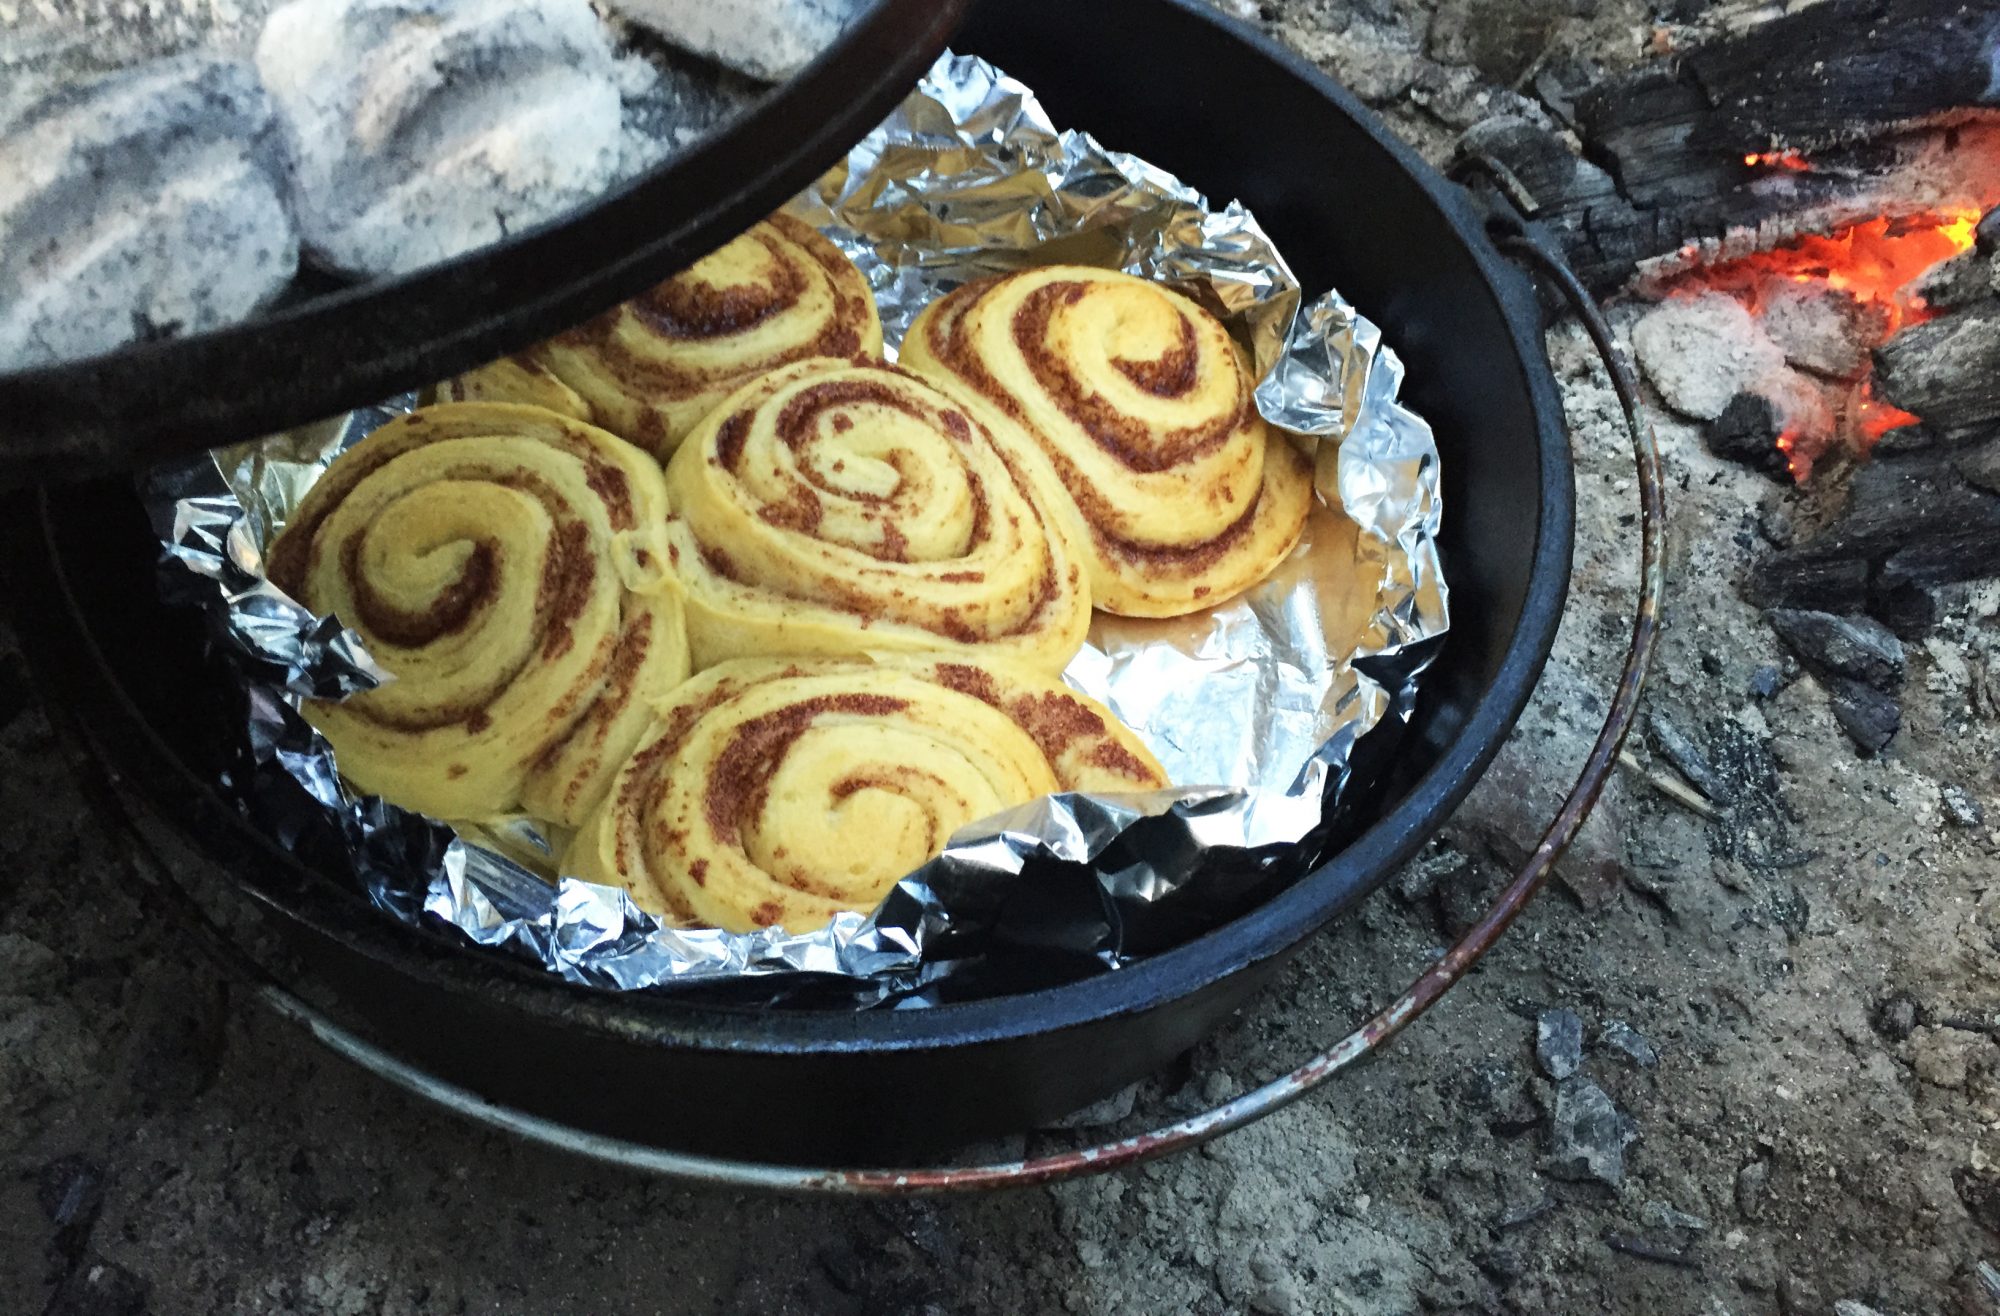
A huge Rookie mistake is lifting the lid too soon to check progress, during covered Dutch Oven cooking or baking. It allows precious heat to escape and can set your cook time back, easily 15 minutes.
Normal air temperatures are considered 70°F and above. Air temps 70°F and above, even exceeding 100°F have little affect on internal cooking temperatures. As you start going cooler though, you can roughly figure 1°F less internal, for every degree the air temp drops below 70°F. Enough of a drop and you have to compensate with additional top coals.
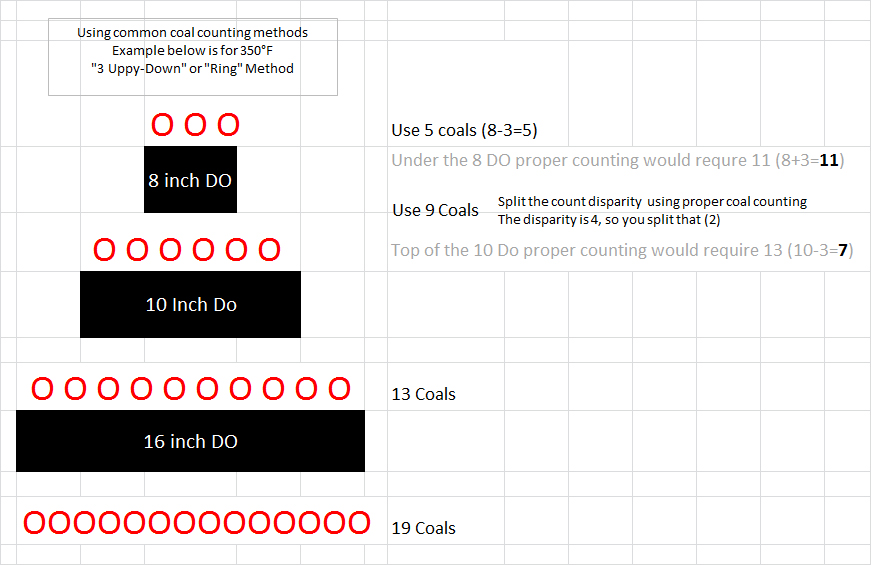
You will find just about any coal counting method will come up with the same amount of briquets. Most are all geared to getting to 350°F, then some tweaking based on more or less recipe temps, air temps, and wind. Some of the fancy phone apps might allow you to input all these variables.
Now to some of the science.
In all coal counting, or coal placement methods, the first rule to remember is more hot coals must be on top and less hot coals must be on the bottom. This applies to any recipe. Whether you are “baking” biscuits, cooking stews or chili, or baking cakes or cobblers.
Heat naturally rises, so more of the bottom heat transfers and is absorbed into the bottom of the DO, from the bottom coals.
The heat needed on the top must radiate down, which requires more coals to produce the same top temperature within the oven. It is not natural for heat to go down.
Since it is natural for the top coals heat to just rise, more of the top heat is lost.
So remember, More coals on top and less on the bottom! Failure to follow this simple rule will result in several things. Burnt on the bottom, not done correctly on the top, or not consistently cooked through-out for normal recipe cook times.
Don’t fail due to a rookie mistake. One of the most common errors of a new or inexperience Dutch Oven cook, is to place too many coals underneath the DO. It is the quickest way to wreck an otherwise perfect recipe.
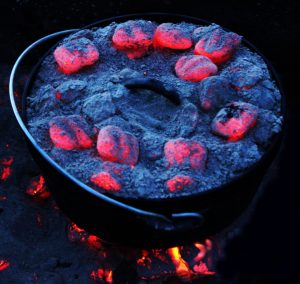
The second rule to remember in all methods of cooking and recipes is, the coals need arranged toward the outer perimeter of both the bottom, as well as the lid to avoid burning. Normally they are not placed in the center area’s.
Thirdly rotate your DO, and DO lid, at various times during the cooking process. This simple technique helps prevent hot spots forming and burning food. Every 15 minutes rotate the lid and bottom 90° in opposite directions.
Cakes are tricky since they might “fall” if the pot is bumped too hard. Dump cakes and cobblers are usually pretty ‘wet’ and normally will not need rotated, thus preventing falling.
Rotate very carefully if you do start rotating cakes. It is best to bake with other techniques to avoid rotating cakes. There are other advanced techniques such as raising pans inside a DO, using an internal trivet. But that is a whole different subject for discussion.
Lastly, Cooking in a Dutch Oven is very forgiving. If you don’t get it quite right it will probably come out OK anyway.
3 UPPY DOWN Heat Rule Method
The simplest rule and easiest to remember. That we have heard of. Uses the “3 Uppy Down Rule”. This is our preferred method. Once you use it a few times, and get it in your head, you won’t have to carry any type of chart. In general it produces 350° in any Diameter size Dutch Oven.
As the title of the rule implies, and knowing you need more heat on top than on the bottom, you have the 3 to remember for any pot.
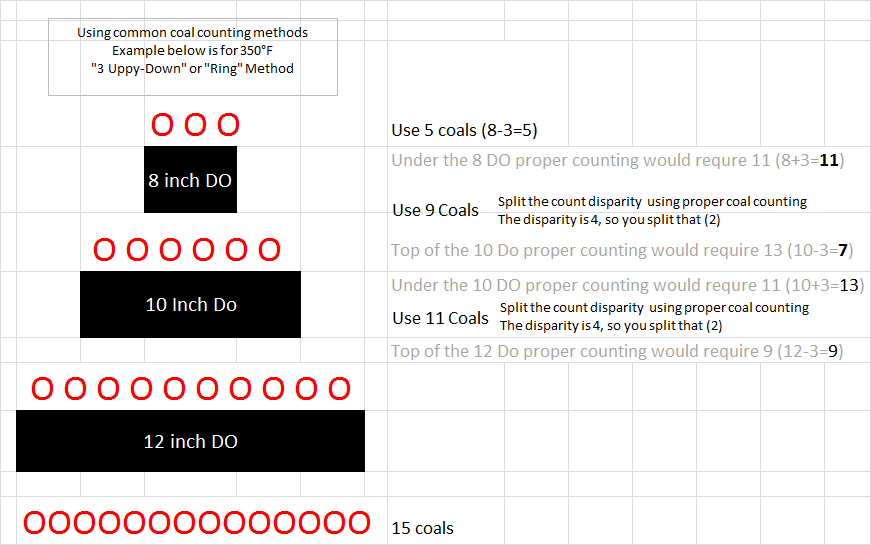
The only other factor is, knowing the Diameter of your pot. If you have a normal depth 12 inch DO, you simply add 3 to the diameter for the top (12+3=15 coals). You then minus 3 from the diameter for the bottom (12-3=9 Coals).
So for another example, if you have a 10 inch DO and needing 350°. TOP coals (10+3=13). Bottom coals (10-3=7)
Rule of thumb for additional heat is; each additional coal, added to the top only, will increase the internal temperature an additional 10 to 20 degrees. Round that off to 15 for rule of thumb.
350° Heat
Size Dutch Oven Top Coals Bottom Coals
9 inch 9+3=12 9-3=6
10 inch 10+3=13 10-3=7
12 inch 12+3=15 12-3=9
14 inch 14+3=17 14-3=11
16 inch 16+3=19 16-3=13
*This is method produces 350° heat. Each Additional coal on top raises the internal temperature 10 to 20°
*Deep Dutch Ovens may need an additional coal or 2 on top to get to the 350° mark (add it to the top)
*Wind, air temperature, and altitude may affect temperature and cook times
*Recipes that need to cook/bake more than an hour need a new batch of coals started at the 45 minute cook mark, then added after the first 55 to 60 minutes of cooking has ended. Re-apply as needed.
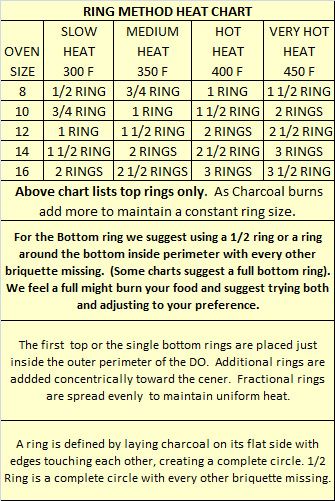
Below is a second method. Preferred by many, More complicated than we like. But if you try this one and like it, print or re-create this chart. Then carry it with your recipes or Dutch Oven Cookbook.
Ring Method Heat Chart Method
Cold Weather Cooking adjustments
Any of the coal counting methods are based on normal, comfortable air temperatures. [Anything in excess of 70°F]
As the air temperature starts dropping below 70°F, the top heat of the Dutch Oven starts dissipating more quickly. It’s not much, but you may have to compensate.
At a normal, comfortable air temperature. Let us use 70°F as the optimum reference point. Air temperatures above 70°F have little affect on internal Dutch Oven cook temperatures. Even if you are cooking in the heat of summer and the air is 100°F.
As the air starts dropping below 70°F, you will find a loss of approximately 1 degree internal Dutch Oven temperature, for every degree loss of air temperature.
For example. Your recipe calls for 350°F. You calculate your coal count based on one of the methods. Lets say, the air temperature is 50°F instead of something 70°F or greater. That equates to a 20°F difference. A single charcoal briquet produces 10-20 degrees of heat. Use 20° for each briquet for easy math. To compensate for the 20 degree air temp loss, you add one extra charcoal to the top lid of your DO. [All extra coals/heat are always added to the top]
If you are cooking in 30°F air temperatures that would be 70-30=40. A 40°F temperature drop from normal. That would require adding two additional briquets. 2 briquets X 20°=40°. Both extra briquets go on the top.
But lots of the adjustments come from experience. So the more you cook the more you will get it right without calculating. Plus Dutch Oven cooking is forgiving. If your internal temperature is slightly low, cooking for more time will often compensate.
We often joke… When it starts smelling good without lifting the lid…. its most likely done. It is important not to ever open the lid during cooking/baking until close to your target bake time, or things start smelling good. At least then it is time to start peeking to check, if you haven’t reached your target time yet….because you could be running slightly hot.
Wind Adjustments
Wind is another factor you have to compensate for. Rather than compensating with additional coals, most experienced Dutch Oven cooks use some type of windscreen or wind blocking method.
Even then, windy conditions may require some additional coals. Judging any and all of this basically comes with experience.
Stacked Dutch Oven Coal Counting
The easiest way to estimate when “stacking” multiple Dutch Ovens. Especially once you exceed 2 high is to stack using decreasing sized Dutch Ovens that correspond to the existing standard coal counting on the lid below it.
In that case the normal coal counting methods apply to all layers based on their diameter or outer circumference.
2 Ovens high of the same size are pretty unforgiving if you are using “wet” recipes such as stews and such.
Toward the bottom of any stack you want your “wet” recipes that are unforgiving, and don’t need rotated to prevent “hot” spots and food burning. Toward the bottom you don’t want your recipes like cakes that will “Fall” when disturbed.
Baked goods that are a “fall” hazard, or ones that need rotated, or checked often toward the end of their bake cycle, need to be on top of the stack.
![]()