SALMON Cedar Plank Grilled
Recipe and Photo submitted by Rick Beach
Image ©2013 Rick Beach
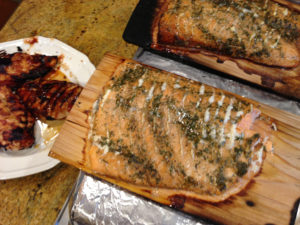
This is a family favorite. Cedar "Planked" Salmon. Also see our favorite Sun Dried Tomato & Basil topping recipe.
Don't wait for summer to be over before you try this recipe. Though cedar is what we prefer, other species of wood are available. We use Cedar specifically sold for cooking on. We find ours at Home Depot in the BBQ area. While some cooks write you can reuse the boards, we never-ever do. In some places the planks are only available seasonally. Don't try native wood or wood that may have been exposed to chemicals. It's worth the price to pay to get what is specifically made for this.
This recipe takes advanced prep. The planks need soaked in water for a minimum of 1 hour. I often times soak them for 3+ hours or overnight. Use a rectangular glass casserole dish and fill high enough with water to completely submerge the planks. Fill a large glass or glass measuring cup with water. Place the filled glass or glasses on top of the planks to weigh them down enough to stay submerged.
I use a 3 burner BBQ grill with a lid. These can be done on any BBQ grill, charcoal grill, or a campfire bed of coals as long as you can cover them to retain the heat and cook at a temperature around 375°. The whole concept is you need to try it and get used to your own cooking method.
With the 3 burner arrangement I turn on all burners to high to pre-heat. Then I turn the center to low and the 2 ends to medium high. My under the lid temps range from 350° to 400°
The soaked planks with the Salmon are placed over the center (lower heat). It is common for the planks to smoke and even burn around the edge some. I keep a spray bottle of water handy and check at 10 minutes, and 15 minutes. I spray soak the edges that might catch fire. Keep the spray water off the fillets. (My total grilling time on my grill is perfect at 20 minutes)
Ingredients
- 1 Skinless Salmon Fillet 2 1/2 to 3 lbs
- 8 Tbsp olive oil
- 4 Large Garlic Cloves Minced
- 2 tsp Sea Salt
- 1 tsp Black Pepper ground
- 3/4 Cup Minced Fresh Dill
- 1 tsp lemon zest (Slice and save what isn't used of the Lemon
- 8 slices Lemon
Instructions
- Make cross cut knife cuts about 1/4 the way through the filets, cutting the slice at 45°
- Place the fillet in a flat glass dish. Mix all the remaining ingredients in a separate bowl (Holding the lemon slices in reserve to grill). Pour half the mixture on the fillet and rub it into the cut marks. Get some of the garlic and dill into those cuts. Then pour the remaining mixture over the fillet and gently lift the fillet to allow the bottom to get coated with the Olive oil mixture. Cover with plastic wrap and Marinate in the fridge a minimum of 1 hour.
- Preheat your grill as previously mentioned.
- Place the marinated Fillet on the water soaked Cedar planks. Place the planks in the center of the grill and cover. At 10 minutes, check and spray soak any part of the plank that may have flared up. Check again at 15. At the total of 15 minutes your fillet may be done. Mine takes 20 minutes. Don't forget to start grilling your lemon slices about 5 minutes before done time. Flip the lemon slices once to get grill marks on both sides.
- Those with a cooler grill may take longer. Don't overcook! There should be juice that starts bubbling out the top of the fillet. When that juice turns white (meaning the top heat cooked the juice bubbling out) the fillet is normally cooked to perfection. But again...you may have to try this once for yourself before attempting to impress your friends. Know your grill. They will remember the taste and ask you when you will be doing this one again!
- The last 5 minutes of cook time brush the lemon slices with olive oil. Place on hot grill to get good grill marks. Serve as a garnish with the final grilled salmon
- Optionally Top with our favorite Sun Dried Tomato and Basil topping.
- Send us some pictures of yours, or let us know how you like this recipe! Thanks and happy grilling!
![]()
