RECIPE:SCALLOPED POTATOES & HAM (Tweaked version)

RECIPE:SCALLOPED POTATOES & HAM (Tweaked version)

Recipe: Rick Beach
Servings 8 Servings

Ingredients
  

  • 2 Tbsp olive oil
  • 1 Cup Celery Chopped
  • 1 Medium Onion Chopped
  • 2 Cloves Garlic diced fine
  • 3 Tbsp Butter Melted
  • 1 tsp Salt
  • 1/2 tsp ground black pepper adjust to taste
  • 1 pinch Cayenne Pepper Optional- if you want it
  • 3 Tbsp Flour
  • 1 Cup Whole milk
  • 1 Cup Heavy cream
  • 1 Cup Sour Cream
  • 1 Cup Cheddar Cheese
  • Ham Sliced Adjust to your liking
  • 5 lbs 4-5 Large Potatoes Peeled and sliced thin 1/4 or less thick

Instructions
 

  • Saute the Celery in the Olive oil, then add the onion and garlic. Saute until translucent.
  • In a large bowl whisk together the sauteed items and all the other ingredients except the Potatoes and Ham.
  • Pour a small amount (About 3/4cup) of the whisked ingredients in the bottom of a greased/well oiled Dutch Oven.
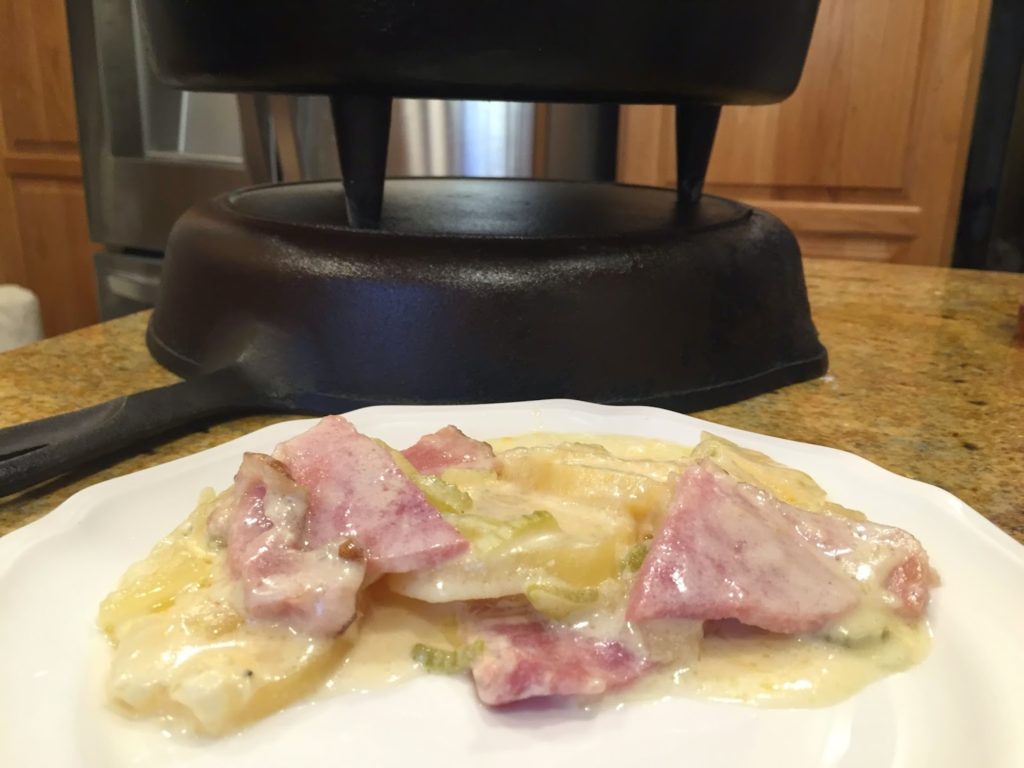
  • Next Layer that with ham. Then Pour another amount (about 3/4 cup) of the whisked ingredients on the Ham.
  • Next Layer that with Potato Slices. Then Pour another amount (about 3/4 cup) of the whisked ingredients on the Ham.
  • Next Layer that with ham. Then Pour another amount (about 3/4 cup) the of whisked ingredients on the Ham.
  • Next Layer that with Potato Slices. Then Pour the remainder of the whisked ingredients on the Ham.
  • Cover the Dutch Oven with its lid. Use hot charcoal for 350 Degrees, more top heat than bottom. Bake about 1- 1 1/2 hours until potatoes are tender.
  • Note: Follow the same directions and heat for baking in your home oven.

Loading

RECIPE SWEET LIME PIE

RECIPE SWEET LIME PIE

This is a "Sweet Lime" Pie recipe. For those unfamiliar with Sweet Limes, when ripe and at peak flavor, they appear more like a lemon. Yellow skin, and pale green on the interior. We grow these in our yard and start enjoying them the middle of December. Key Lime juice could be substituted if you have access to those instead.
Servings 1 Pie

Ingredients
  

  • 5 Egg Yokes Beaten
  • 1 Can 14oz Eagle Brand Sweetened Condensed Milk
  • 1/2 Cup Sweet Lime Juice
  • 1/8 tsp Vanilla
  • 1 Pinch Salt fine ground Sea Salt
  • 1 9 inch Prepared Graham Cracker Crust

Instructions
 

  • Preheat Oven to 375°F
  • Combine the beaten egg yokes, sweetened condensed milk, vanilla, salt, and lime juice. Whisk well until silky smooth. Dump into the unbaked graham cracker crust.
  • Bake in preheated oven for 15 minutes. Toothpick test should come out clean. Do no over bake.
  • Allow to cool then chill.
  • Top with whipped cream when served.

Loading

RECIPE: Pumpkin Roll with Cream Cheese Filling

RECIPE: Pumpkin Roll with Cream Cheese Filling

This Pumpkin Roll with Cream Cheese Filling is a Holiday favorite. Exceptional any time of the year severed with a cup of coffee. Way easier to prepare than most people think.
Prep Time 25 minutes
Cook Time 15 minutes
Total Time 1 hour 40 minutes
Servings 10 Servings

Ingredients
  

The Cake Roll

  • 3 Eggs Room Temperature
  • 1 Cup Granulated Sugar
  • 2/3 Cup Canned Pumpkin
  • 1 tsp Lemon Juice
  • 3/4 Cup Flour
  • 1 tsp Baking Powder
  • 2 tsp Cinnamon (ground)
  • 1 tsp Ginger (ground)
  • 1/2 tsp Nutmeg (ground)
  • 1 Pinch Clove Powder (ground)
  • 1/2 tsp Salt

Cream Cheese Filling

  • 8 oz cream cheese softened
  • 5 Tbsp Butter softened
  • 1 Cup Powdered Sugar
  • 1 tsp Vanilla extract

Powdered sugar for the towel

  • 1/2 Cup Powdered Sugar Enough to cover towel

Instructions
 

The Cake

  • Note: 2/3 Cups of Pumpkin is half of a 15 oz can of canned Pumpkin. So instead of wasting a partial can, plan on making a double batch (2 Rolls). The recipe above is for a single batch (1 Roll).
  • Heat Oven to 350°F. Prepare a greased 10x15 jelly roll pan (cookie sheet). Line the bottom with wax paper, then lightly spray the wax paper with a spray oil such as Pam.
  • Lay out on your counter, a thin towel, sized at least the size of your jelly roll pan. Sprinkle it liberally with powdered sugar.
  • In a large bowl lightly beat the eggs. Gradually beat in the sugar, beat until thick and light yellow. (4 to 5 minutes of beating). Add the pumpkin and lemon juice and beat on low until blended.
  • In a separate bowl, combine/sift the flour, baking powder, spices, and salt. Add the sifted dry ingredients to the egg mixture. Whisk until well combined. Spread the batter onto the prepare Jelly pan.
  • Bake in the preheated oven for 12 to 15 minutes. The cake should spring back when lightly touched with your finger. Start checking at 12 minutes, and at 1 minute intervals after that. Remove the cake from the oven and run a knife along side all edges to help release it from the pan. Immediately flip the cake/pan onto the powdered sugar covered towel. Gently lift the upside down pan away and the cake should remain behind on the towel. Gently peel away the wax paper and discard it.
  • Starting on the narrow end of the cake, roll the cake and the towel up together to form a log. Place this on a wire rack to cool.

Filling

  • While the cake is cooling prepare the filling. In a small bowl sift the powdered sugar and set it aside. Using a mixer, Beat together the cream cheese and butter until light and fluffy (about 4 minutes). Gradually beat in the sifted powdered sugar and vanilla. Beat until smooth.

The Filling & the Rolling

  • Once the cake roll is cool (needs to be cool to avoid melting the filling), carefully unroll the cake. Spread the cream cheese filling evenly over the entire surface of the cake. Then roll the cake and filling (not the towel this time) into a log, or roll. Wrap in plastic wrap and chill at least 1 hour in the refrigerator before serving. These can be made ahead and frozen.
  • Slice the cake and filling roll into 1 inch slices. Keep leftovers in the refrigerator.

Loading

CRISBEE Cast Iron Seasoning Product [Product Review]

Are you searching for a product to season your Cast Iron?  Every heard of people using bee’s wax?   This is a blend that in fact contain bee’s wax.

Here is our review of the product that spans 2 years.
Click here for our full review on the CRISBEE product.

Get our Blog post notifications sent to you automatically.

Subscribe to Our Email List
Subscribe to our Email List to receive our latest Posts that are often packed with interesting and informative content, Special Events notifications, as well as offers that may not be extended to the general public.  Our entry form is simply.  We do not ask for, or retain any personal information.  Your privacy is a priority.  We do not share or sell information.  You can “Unsubscribe” at any time.

Loading

STARGAZER adding a new Skillet – 12 inch

We got wind that Stargazer will soon be taking orders for their newest addition.  The 12 inch skillet.

For you Cast Iron connoisseurs that love the smooth finish of some vintage cast iron.  Also cast iron produced in the USA, and you don’t know about Stargazer.  You need to investigate this brand.

We purchased one of their original 10 inch skillets to evaluate.  We reviewed the product, and how it performed with our seasoning process.  You can order them raw, or seasoned for an additional charge.  Our 10 inch was ordered raw.

When they start taking orders for the new 12 inch we are going to order one that is already seasoned just to compare.

Follow the Link to our review of the 10 inch Stargazer Skillet.  

Check back soon for updates on what we learn about the 12 Inch.

If you aren’t on our email list be sure to sign up so you get automatic notifications when we post a new Blog article.

Subscribe to Our Email List
Subscribe to our Email List to receive our latest Posts that are often packed with interesting and informative content, Special Events notifications, as well as offers that may not be extended to the general public.  Our entry form is simply.  We do not ask for, or retain any personal information.  Your privacy is a priority.  We do not share or sell information.  You can “Unsubscribe” at any time.

Loading

Bridge Beach Model 888 Vintage Stove

This Bridge Beach Model 888  Stove is an exceptional example of  vintage craftsmanship.

We list vintage cast iron in many forms to help the novice collector.  See details below the image.

Read the full article at this link – Bridge Beach Model 888

Subscribe to Our Email List
Subscribe to our Email List to receive our latest Posts that are often packed with interesting and informative content, Special Events notifications, as well as offers that may not be extended to the general public.  Our entry form is simply.  We do not ask for, or retain any personal information.  Your privacy is a priority.  We do not share or sell information.  You can “Unsubscribe” at any time.

Loading

BREAD Artisan Flax Seed & Beer

BREAD Artisan Flax Seed & Beer (No Knead)

This is a no knead yeast bread. It does require allowing it to self rise overnight on the counter.
Servings 1 Loaf

Ingredients
  

  • 3 Cups Flour
  • 1/4 Cup Ground Flax Seed
  • 1 1/2 tsp Salt
  • 1/2 tsp Yeast Instand Rapid Rise Bread Machine Type
  • 12 oz Beer Varieties Change the Flavor (Experiement)

Instructions
 

  • In a large dough mixing bowl. Add Salt, Yeast, and ground Flax Seed to Flour
  • Add Beer to the combined dry ingredients. Stir together until completely mixed into a rough ball.
  • Cover with plastic wrap and let sit on counter 6-18 hours.
  • Sometime after the initial 8 hours when dough has at least doubled, turn the "proofed" dough out onto a floured board. Pat the dough out flat. Fold over on itself 4 or 5 times. (No Kneading)
  • Oil the inside of your Dutch Oven. Place the dough into the oiled Dutch Oven. Oil the top of the dough. Cover with plastic wrap once again. Allow to raise 1 1/2 to 3 hours. Gently peel the plastic off when time to bake to avoid deflating the dough. Using a 8 inch Dutch Oven you will bake with the lid off. Using a 10 in Dutch Oven you can bake with the lid on or off. If baking with the lid on be sure to coat the lid with oil. The dough will most likely push up to the lid and recreate the lid pattern. It also may actually push the lid up higher, until you get more familiar with this baking technique and perhaps not adding all the dough based on your baking vessel size.
  • Preheat oven to 450°F Bake about 30 minutes or until golden brown. If you tap on the crust you should hear the distinctive hollow sound of properly baked bread.
  • Shake out the loaf to cool on a rack. For soft crust, brush all surfaces with butter once out of the Pan/Dutch Oven, and still hot.

Loading